Change Preference Summary

1 Comment

In Today’s post we are going to look at How to Change Summary of Edit Text Preference. But before moving ahead, if you want to know more about Preferences click here.

First create a preference screen with only one preference EditTextPreference as show below in xml. Let us call this xml as setttings.xml

<?xml version="1.0" encoding="utf-8"?>
<PreferenceScreen xmlns:android="http://schemas.android.com/apk/res/android" >
    <EditTextPreference
        android:dialogTitle="Enter Name"
        android:key="name"
        android:summary="Enter Your Name"
        android:title="Edit Text Preference" />
</PreferenceScreen>

As shown above we are creating EditTextPreference with key “name“.

Now create a class called AdvancePreferenceExample which extends PreferenceActivity and implements onSharedPreferenceChangeListener as shown below.

import android.content.SharedPreferences;
import android.content.SharedPreferences.OnSharedPreferenceChangeListener;
import android.os.Bundle;
import android.preference.EditTextPreference;
import android.preference.Preference;
import android.preference.PreferenceActivity;

public class AdvancePreferenceExample extends PreferenceActivity implements OnSharedPreferenceChangeListener{

	private static final String KEY_EDIT_TEXT_PREFERENCE = "name";
	@Override
	protected void onCreate(Bundle savedInstanceState) {
		// TODO Auto-generated method stub
		super.onCreate(savedInstanceState);
		addPreferencesFromResource(R.xml.settings);
	}

	@Override
	protected void onResume(){
		super.onResume();
		// Set up a listener whenever a key changes
		getPreferenceScreen().getSharedPreferences()
			.registerOnSharedPreferenceChangeListener(this);
		updatePreference(KEY_EDIT_TEXT_PREFERENCE);
	}

	@Override
	protected void onPause() {
		super.onPause();
		// Unregister the listener whenever a key changes
		getPreferenceScreen().getSharedPreferences()
			.unregisterOnSharedPreferenceChangeListener(this);
	}

	@Override
	public void onSharedPreferenceChanged(SharedPreferences sharedPreferences,
			String key) {
		updatePreference(key);
	}

	private void updatePreference(String key){
		if (key.equals(KEY_EDIT_TEXT_PREFERENCE)){
			Preference preference = findPreference(key);
			if (preference instanceof EditTextPreference){
				EditTextPreference editTextPreference =  (EditTextPreference)preference;
				if (editTextPreference.getText().trim().length() > 0){
					editTextPreference.setSummary("Entered Name is  " + editTextPreference.getText());
				}else{
					editTextPreference.setSummary("Enter Your Name");
				}
			}
		}
	}

}

Implementing onSharedPreferenceChangeListener helps to capture event that occur when value of any of  the Preference is changed via method onSharedPreferenceChanged. Method onSharedPreferenceChanged has two parameters:

  1. Instance of SharedPreferences having the key and value of the Preferences defined in the preferences screen via xml
  2. Key of the preferences whose value has changed.

We need to register the above class, so as  to get  onSharedPreferenceChanged method of this class is called whenever  shared preference values get changed and this is achieved by following line in onResume method.

getPreferenceScreen().getSharedPreferences()
			.registerOnSharedPreferenceChangeListener(this);

Similarly we also need to unregister the listener which is done in onPause method.

getPreferenceScreen().getSharedPreferences()
			.unregisterOnSharedPreferenceChangeListener(this);

Method updatePreference accepts key of the preferences to be updated. This methods first compares the key and if key matches with that of EditTextPreference key, EditTextPreference  summary will be updated accordingly. This method is called from onSharedPreferenceChanged method and also for onResume method. Reason for calling it from onResume method is to make sure that summary is processed and updated appropriately even when screen comes up for the 1st time after App as started.

Conclusion

In  above post we saw how to capture event raised when value of preferences change and  how we can use onSharedPreferenceChanged method and updated summary of EditTextPreference.
Introduction to Android SQLite Database

6 Comments

Android provide various options for data persistence like Preferences, File and Database etc. This post we will introduce you to one of the option i.e. Android SQLite Database.

Let us take an example of Student database. i.e. student_database (DATABASE_NAME). We will create table tb_student (DATABASE_TABLE), with 3 columns i.e. _id (KEY_ROWID), name (KEY_NAME) and grade (KEY_GRADE). Columns _id is primary key and autoincrement, while name and garde are text .

We will 1st create a class called DatabaseUtilDatabaseUtil is the main class that will used by other activities and will have various method to perform database operations like insert, delete etc

DatabaseUtil has private inner class DatabaseHelper, which is responsible for creating and updating database.

Below is the code for DatabaseUtil.

package com.dbexample;

import android.content.ContentValues;
import android.content.Context;
import android.database.Cursor;
import android.database.SQLException;
import android.database.sqlite.SQLiteDatabase;
import android.database.sqlite.SQLiteOpenHelper;
import android.util.Log;

public class DatabaseUtil{

	private static final String TAG = "DatabaseUtil";

	/**
	 * Database Name
	 */
	private static final String DATABASE_NAME = "student_database";

	/**
	 * Database Version
	 */
	private static final int DATABASE_VERSION = 1;

	/**
	 * Table Name
	 */
	private static final String DATABASE_TABLE = "tb_student";

	/**
	 * Table columns
	 */
	public static final String KEY_NAME = "name";
	public static final String KEY_GRADE = "grade";
	public static final String KEY_ROWID = "_id";

	/**
	 * Database creation sql statement
	 */
	private static final String CREATE_STUDENT_TABLE =
		"create table " + DATABASE_TABLE + " (" + KEY_ROWID + " integer primary key autoincrement, "
		+ KEY_NAME +" text not null, " + KEY_GRADE + " text not null);";

	/**
	 * Context
	 */
	private final Context mCtx;

	private DatabaseHelper mDbHelper;
	private SQLiteDatabase mDb;

	/**
	 * Inner private class. Database Helper class for creating and updating database.
	 */
	private static class DatabaseHelper extends SQLiteOpenHelper {
		DatabaseHelper(Context context) {
			super(context, DATABASE_NAME, null, DATABASE_VERSION);
		}
		/**
		 * onCreate method is called for the 1st time when database doesn't exists.
		 */
		@Override
		public void onCreate(SQLiteDatabase db) {
			Log.i(TAG, "Creating DataBase: " + CREATE_STUDENT_TABLE);
			db.execSQL(CREATE_STUDENT_TABLE);
		}
		/**
		 * onUpgrade method is called when database version changes.
		 */
		@Override
		public void onUpgrade(SQLiteDatabase db, int oldVersion, int newVersion) {
			Log.w(TAG, "Upgrading database from version " + oldVersion + " to "
					+ newVersion);
		}
	}

	/**
	 * Constructor - takes the context to allow the database to be
	 * opened/created
	 *
	 * @param ctx the Context within which to work
	 */
	public DatabaseUtil(Context ctx) {
		this.mCtx = ctx;
	}
	/**
	 * This method is used for creating/opening connection
	 * @return instance of DatabaseUtil
	 * @throws SQLException
	 */
	public DatabaseUtil open() throws SQLException {
		mDbHelper = new DatabaseHelper(mCtx);
		mDb = mDbHelper.getWritableDatabase();
		return this;
	}
	/**
	 * This method is used for closing the connection.
	 */
	public void close() {
		mDbHelper.close();
	}

	/**
	 * This method is used to create/insert new record Student record.
	 * @param name
	 * @param grade
	 * @return long
	 */
	public long createStudent(String name, String grade) {
		ContentValues initialValues = new ContentValues();
		initialValues.put(KEY_NAME, name);
		initialValues.put(KEY_GRADE, grade);
		return mDb.insert(DATABASE_TABLE, null, initialValues);
	}
	/**
	 * This method will delete Student record.
	 * @param rowId
	 * @return boolean
	 */
	public boolean deleteStudent(long rowId) {
		return mDb.delete(DATABASE_TABLE, KEY_ROWID + "=" + rowId, null) > 0;
	}

	/**
	 * This method will return Cursor holding all the Student records.
	 * @return Cursor
	 */
	public Cursor fetchAllStudents() {
		return mDb.query(DATABASE_TABLE, new String[] {KEY_ROWID, KEY_NAME,
				KEY_GRADE}, null, null, null, null, null);
	}

	/**
	 * This method will return Cursor holding the specific Student record.
	 * @param id
	 * @return Cursor
	 * @throws SQLException
	 */
	public Cursor fetchStudent(long id) throws SQLException {
		Cursor mCursor =
			mDb.query(true, DATABASE_TABLE, new String[] {KEY_ROWID,
					KEY_NAME, KEY_GRADE}, KEY_ROWID + "=" + id, null,
					null, null, null, null);
		if (mCursor != null) {
			mCursor.moveToFirst();
		}
		return mCursor;
	}

	/**
	 * This method will update Student record.
	 * @param id
	 * @param name
	 * @param standard
	 * @return boolean
	 */
	public boolean updateStudent(int id, String name, String standard) {
		ContentValues args = new ContentValues();
		args.put(KEY_NAME, name);
		args.put(KEY_GRADE, standard);
		return mDb.update(DATABASE_TABLE, args, KEY_ROWID + "=" + id, null) > 0;
	}
}

In the above code as we can see DatabaseUtil have a private inner class DatabaseHelper which extends SQLiteOpenHelperSQLiteOpenHelper have following methods:

  1. onCreate
  2. onUpgrade
  3. onOpen
  4. getWritableDatabase
  5. getReadableDatabase
  6. close

Out Of the above methods, onCreate and onUpgrade are two methods which we have overridden in subclass DatabaseHelper. Method onCreate is called for the 1st time when database is created/opened, and hence is used for creating table and populating them with predefined data if needed. Method onUpgrade is called when database needs to be upgarded in terms like, adding new tables, new colums to the existing tables etc based on the database version.

Database version for this example is set to 1 via DATABASE_VERSIONvariable.

Note: this class assumes monotonically increasing version numbers for upgrades. Also, there is no concept of a database downgrade; installing a new version of your app which uses a lower version number than a previously-installed version will result in undefined behavior.

Method onOpen is called when connection to database is opened. This method can be used for instance like checking read-only before updating database.

Methods getWritableDatabase and getReadableDatabase are responsible for creating or opening the database. The first time getWritableDatabasemethod is called it will call onCreateonUpgrade and/or onOpen method is called.

Method close is used for closing the opened database.

Now let us look at the code snippet for creating/inserting  student record.

DatabaseUtil dbUtil = new DatabaseUtil(this);
dbUtil.open();
dbUtil.createStudent("Prashant Thakkar", "10th");
dbUtil.close();

As seen, first we created instance of DatabaseUtil class by passing the context of the class (Activity) in which this code is written. After creating instance call open method, which is responsible for opening database in writable mode (refer sample code above).  Now call createStudent method which accepts 2 parameters name and standard and create student record. Finally call close method to close the opened database.

After insertion, now let us look at the code snippet for fetching data from Students table.

DatabaseUtil dbUtil = new DatabaseUtil(this);
dbUtil.open();
Cursor cursor = dbUtil.fetchAllStudents();
if(cursor != null){
   while(cursor.moveToNext()){
	Log.i("Student", "Student Name: " + cursor.getString(1) +
               " Grade " + cursor.getString(2));
   }
}
dbUtil.close();

For fetching all students from student table we will call fetchAllStudents of DatabaseUtil class. Method fetchAllStudents return Cursor. We will check cursor for null and then iterate through it and print name and standard for each student.  Student name is fetched from cursor by calling cursor.getString(1), here 1 represent the position of column holding the Student Name in the String array passed while querying the database.

To know more about SQLite Datatypes.

Conclusion

This post introduces you to the basics of Android SQLite Database with sample code.

Android Menus

5 Comments

Menus are one of the most important parts of any application and when it comes to mobile Menus become more important considering the fact that area available is restricted. Through this blog we will  look at the following various type of Android Menus available with example for each of them:

  • Options Menu
  • Context Menu
  • Submenu

Options Menu:

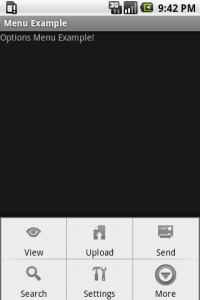
Menu opened when MENU key on the device is clicked is called options menu.

Based on the number of menu options, options menu can be further classified as

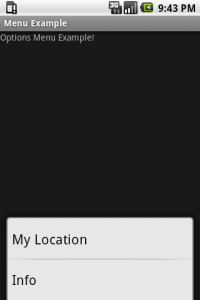
  • Icon Menu : Options menu can have any number of menu options, but only 1st six options are shown directly on MENU key click of device and this is called as Icon Menu.
  • Expanded Menu : In case there are more than six options then 1st five are show directly and remaining are available when More button is clicked and is called as Expanded Menu.
public boolean onCreateOptionsMenu(Menu menu) {
		menu.add(0, MENU_VIEW, 0, "View").setIcon(R.drawable.ic_menu_view);
		menu.add(0, MENU_UPLOAD, 0, "Upload").setIcon(R.drawable.ic_menu_upload);
		menu.add(0, MENU_SEND, 0, "Send").setIcon(R.drawable.ic_menu_send);
		menu.add(0, MENU_SEARCH, 0, "Search").setIcon(R.drawable.ic_menu_search);
		menu.add(0, MENU_SETTINGS, 0, "Settings").setIcon(R.drawable.ic_menu_settings);
		menu.add(0, MENU_MY_LOCATION, 0, "My Location").setIcon(R.drawable.ic_menu_mylocation);
		menu.add(0, MENU_INFO, 0, "Info").setIcon(R.drawable.ic_menu_info_details);
		return true;
	}

public boolean onOptionsItemSelected(MenuItem item) {
		switch(item.getItemId()){
		case MENU_VIEW:
			// Code for menu option View
			return true;
		case MENU_UPLOAD:
			// Code for menu option Upload
			return true;
		case MENU_SEND:
			// Code for menu option Send
			return true;
		case MENU_SEARCH:
			// Code for menu option Search
			return true;
		case MENU_MY_LOCATION:
			// Code for menu option Location
			return true;
		case MENU_SETTINGS:
			// Code for menu option Settings
			return true;
		case MENU_INFO:
			// Code for menu option Info
			return true;
		default:
			return false;
		}

	}

}

Options Menu

Options Menu (Icon Menu)

Options Menu

Options Menu (Expanded Menu)

Points to Remember:

  • onCreateOptionsMenu(): This method of the Activity is called on Menu Key click of the device. Override this method in the activity to populate the Menu object passed as parameter to this method.
  • Multiple add() methods are available for adding Menu options. Use the one that accepts itemId as a parameter.
  • setIcon() is used for assigning icon.
  • onOptionItemSelected(): This method of the activity is called when a particular Item/Option of the menu is clicked. Override this method in the activity and provide code to perform respective actions based on the menu option selected.

It is not mandatory to have icon for Icon Menu options. But in case if icons are associated with menu options in that case Icon are displayed for Icon Menu only.

Context Menu:

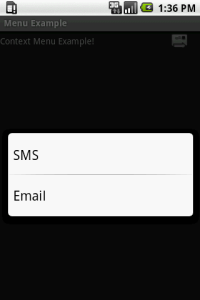
As name suggest, Context Menu is the menu in context/associated with some object. Long-press on the view will bring up registered Context menu.

public void onCreateContextMenu(ContextMenu menu, View v,
			ContextMenuInfo menuInfo) {
		super.onCreateContextMenu(menu, v, menuInfo);
		menu.add(0, MENU_SMS, 0, "SMS");
		menu.add(0, MENU_EMAIL, 0, "Email");
	}

public boolean onContextItemSelected(MenuItem item) {
		switch(item.getItemId()){
		case MENU_SMS:
			// Code for menu option Edit
			return true;
		case MENU_EMAIL:
			// Code for menu option Delete
			return true;
		default:
			return false;
		}
	}

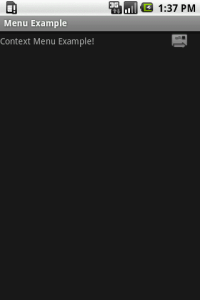
For this example context menu is register to be shown on Button.

Button share = (Button)findViewById(R.id.Share);
		registerForContextMenu(share);
context_menu

Context Menu Example

context_menu

Context Menu

Points to Remember:

  • registerForContextMenu(): This method is used to registered context menu with view.
  • onCreateContextMenu(): This method of Activity is called on click (long-press) of registered view. Override this method to populate Context menu options.
  • onContextItemSelected(): This method of activity is called when item/option from context menu is selected. Override this method in the activity and provide code to perform respective actions based on the menu option selected.

Submenus:

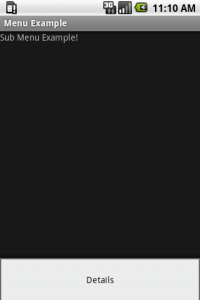
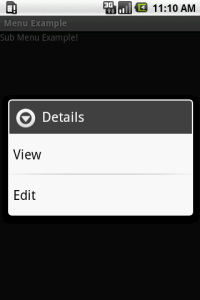
Sub menu is the nested menu that can be added to any type of menu (options or context menu).

Below code shows adding Submenu for Options menu:

public boolean onCreateOptionsMenu(Menu menu) {
		SubMenu subMenu = menu.addSubMenu("Details");
		subMenu.add(0,MENU_VIEW,0,"View");
		subMenu.add(0,MENU_EDIT,0,"Edit");
		return true;
	}
public void onCreateContextMenu(ContextMenu menu, View v,
			ContextMenuInfo menuInfo) {
		super.onCreateContextMenu(menu, v, menuInfo);
		menu.add(0, MENU_SMS, 0, "SMS");
		menu.add(0, MENU_EMAIL, 0, "Email");
	}
Option Sub Menu

Option Sub Menu Example

Option Sub Menu

Option Sub Menu

Points to Remember:

  • Sub menu cannot be nested further i.e. Sub menu cannot have sub menu.
  • When sub menu item is clicked, the parent menus onItemSelected method is called. In above example, sub menu is for options menu item hence, on click of sub menu item, onOptionsItemSelected method is called.

Defining Menu via XML

Instead initiating Menu in code as shown above the best practice is to define menu in XML and then inflate menu using this XML in the code. Thus by defining menu in XML, we separate design and implementation.

Options Menu via XML

Create sampleoptionsmenu.xml under folder res/menu

<?xml version="1.0" encoding="utf-8"?>
<menu xmlns:android="http://schemas.android.com/apk/res/android">
	<item android:title="View" android:id="@+id/MENU_VIEW"
		android:icon="@drawable/ic_menu_view" />
	<item android:title="Upload" android:id="@+id/MENU_UPLOAD"
		android:icon="@drawable/ic_menu_upload" />
	<item android:title="Send" android:id="@+id/MENU_SEND"
		android:icon="@drawable/ic_menu_send" />
	<item android:title="Search" android:id="@+id/MENU_SEARCH"
		android:icon="@drawable/ic_menu_search" />
	<item android:title="Settings" android:id="@+id/MENU_SETTINGS"
		android:icon="@drawable/ic_menu_settings" />
	<item android:title="My Location" android:id="@+id/MENU_MY_LOCATION"
		android:icon="@drawable/ic_menu_mylocation" />
	<item android:title="Info" android:id="@+id/MENU_INFO"
		android:icon="@drawable/ic_menu_info_details" />
</menu>
 public boolean onCreateOptionsMenu(Menu menu) {
	MenuInflater inflater = new MenuInflater(this);
	inflater.inflate(R.menu.sampleoptionsmenu, menu);
	return true;
}

As we can see if we use XML for creating menu the code in onCreateOptionsMenu() method is reduced.

Let us look at each element:

  • <menu>: This element act as a container for menu items. This element must be the root node of the file.
  • <item>: Represents menu item. Can have <menu> as sub elements for creating sub menus
  • <group>: Optional element, that allows grouping of element.

Submenu via XML

<?xml version="1.0" encoding="utf-8"?>
<menu
  xmlns:android="http://schemas.android.com/apk/res/android">
  <item android:id="@+id/MENU_DETAILS"
	android:title="Details">
	<menu>
		<item android:id="@+id/MENU_VIEW" android:title="View"></item>
		<item android:id="@+id/MENU_EDIT" android:title="Edit"></item>
	</menu>
</item>
</menu>

Conculsion

This blog post covered all type of menus (options, context and submenu) available in Android with sample code.

Android Async Task

4 Comments

Through this article we will look at one of the important feature of Android i.e AsyncTask for performing task which takes long time for execution with example. Also we will look at other mechanisms and see why AsyncTask is better approach.

Android application follows single thread model i.e. when android application is launched, a thread is created for running that application. This single thread model works fine for normal execution, but for the instance like network call which are usually long operations, UI hangs waiting for the response from the server.
One of the methods that promptly come to our mind is to create a new thread and implements its run method for performing time consuming long operations.

public void onClick(View v) {
    Thread t = new Thread(){
    public void run(){
	// Long time comsuming operation
	  }
   };
   t.start();
}

The above approach of creating new thread for performing time consuming long operations would have worked fine but since Android implements single thread model and Android UI toolkit is not thread safe i.e. UI must always be updated in UI thread, updating UI view at the end of long operation may lead to some issues like UI hangs.

Following are the various mechanisms provided by android via which we can access UI thread from other threads.

  • Activity.runOnUiThread(Runnable)
  • View.post(Runnable)
  • View.postDelayed(Runnable, long)
  • Handler

Let us look at each of them.

runOnUIThread

This activity method will run on UI thread. If the current thread is the UI thread, then the action is executed immediately. Or else the action is posted to the event queue of the UI thread.

	public void onClick(View v) {
		Thread t = new Thread(){
			public void run(){
				// Long time consuming operation
				_activity.runOnUiThread(new Runnable() {

					@Override
					public void run() {
						_activity.setStatus("Long Operation Completed");

					}
				});
			}
		};
		t.start();
	}

post & postDelayed

These methods are of view and are use for updating the view. They place action (Runnable) in the message queue and this runnable action runs on UI thread.

post

	public void onClick(View v) {
		// TODO Auto-generated method stub
		Thread t = new Thread(){
			@Override
			public void run() {
				// Long time consuming operation
				status.post(new Runnable() {

					@Override
					public void run() {
						status.setText("Long Operstion Completed");

					}
				});
			}
		};
		t.start();
	}

postDelayed

	public void onClick(View v) {
		// TODO Auto-generated method stub
		Thread t = new Thread(){
			@Override
			public void run() {
				// Long time consuming operation
				status.postDelayed(new Runnable() {

					@Override
					public void run() {
						status.setText("Long Operstion Completed");

					}
				}, 1000);
			}
		};
		t.start();
	}

As we can see the difference between the post and postDelayed is that postDelayed accepts one more parameter defining the delayed for the execution of action.

Handler

private Handler handler = new Handler() {
@Override
	public void handleMessage(Message msg) {
		// Code to process the response and update UI.
	}
};

Above code snippets shows mechanism to create Handler. Here we have to override method handleMessage for Handler which accepts object of Message as paarameter.

Now look at the code snippet for long operation and see how this Handler is called.

	public void onClick(View v) {
		Thread t = new Thread(){
			public void run(){
				// Long time comsuming operation
				Message myMessage=new Message();
				Bundle resBundle = new Bundle();
				resBundle.putString("status", "SUCCESS");
				myMessage.obj=resBundle;
				handler.sendMessage(myMessage);
			}
		};
		t.start();
	}

After the execution of long operation result is set in Message and passed to sendMessage of handler. Handler will extract the response from Message and will process and accordingly update the UI. Since Handler is part of main activity, UI thread will be responsible for updating the UI.

All the above said approaches enforces creation of thread and implementing its run() method. All this make code more complex and difficult to read. To simplify this process of performing long operation and updating UI, Android introduced AsyncTask.

AsyncTask

With AsyncTask android takes care of thread management leaving business login writing to us.
public class LongTimeConsumingOperation extends AsyncTask<String, Void, String> {

	@Override
	protected String doInBackground(String... params) {
		// perform Long time consuming operation
		return null;
	}

	/* (non-Javadoc)
	 * @see android.os.AsyncTask#onPostExecute(java.lang.Object)
	 */
	@Override
	protected void onPostExecute(String result) {
		// TODO Auto-generated method stub
		super.onPostExecute(result);
	}

	/* (non-Javadoc)
	 * @see android.os.AsyncTask#onPreExecute()
	 */
	@Override
	protected void onPreExecute() {
		// TODO Auto-generated method stub
		super.onPreExecute();
	}

	/* (non-Javadoc)
	 * @see android.os.AsyncTask#onProgressUpdate(Progress[])
	 */
	@Override
	protected void onProgressUpdate(Void... values) {
		// TODO Auto-generated method stub
		super.onProgressUpdate(values);
	}

}

For executing AsyncTask, call execute method as shown in onClick method.

public void onClick(View v) {
new LongTimeConsumingOperation().execute("");
}

Let us understand AsyncTask with the help of above example:

  • Extend class AsyncTask and implements its methods.
  • onPreExecute: This method is called before doInBackground method is called.
  • doInBackground: Code to perform long operations goes here.
  • onPostExecute: As the name suggest this method is called after doInBackground completes execution.
  • onProgressUpdate: Calling publishProgress anytime from doInBackground call this method.

onPostExecute, onPreExecute and onProgressUpdate is optional and need not be overridden.

Also look at how we have extended LongTimeConsumingOperation with AsyncTask and understand AsyncTask generics.

AsynTask<String, void, String>

Things to note here are:

  • 1st String represents Params i.e the type of parameter doInBackground method will accept and also represents the type of parameter execute method will accept.
  • 2nd void represent Progress i.e the parameter type for onProgressUpdate method
  • 3rd String represents Result i.e the type of parameter accepted by onPostExecute method

Rules to Remember

While implementing AsyncTask we need to remember following rules:

  • Task can be executed only once.
  • Instance of AsyncTask needs to be created in UI thread. As shown above in onClick method a new instance of LongTimeConsumingOperation is created.
  • execute method with parameters should be called from UI thread.
  • Methods onPostExecute, onPreExecute and onProgressUpdate should not be called explicitly.

Conculsion

Through AsyncTask android provides an robust way of performing task and handling UI updating.

Android Preferences

21 Comments

Most of applications have some setting which user can/needs to configure, and to do this setting a screen needs to be designed along with code to read the data and display and update the data back.

In Android we can do this with minimum efforts via Preferences. Another advantage of using Android preference for application setting helps Android user because it will be uniform across the applications.

In this article we will look at the standard Preference available i.e. ListPrefernce, EditTextPreference, RingtonePreference and CheckBoxPreference via sample code.

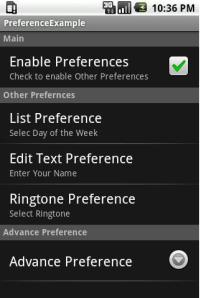
Below screen shot is the output showing all the standard preferences.

Android Preferences

Android Preferences

As show above preferences are classified in to 3 categories.

  • Main: CheckBox Preference
  • Other Preferences: List Preference, EditText Preference and Ringtone Preference
  • Advance Preference: Advance Preference
<?xml version="1.0" encoding="utf-8"?>
<PreferenceScreen xmlns:android="http://schemas.android.com/apk/res/android">
	<PreferenceCategory android:title="Main">
		<CheckBoxPreference android:title="Enable Preferences"
			android:key="EnablePreferences" android:summary="Check to enable Other Preferences" />
	</PreferenceCategory>
	<PreferenceCategory android:title="Other Prefernces">
		<ListPreference android:title="List Preference"
			android:key="DayOfWeek" android:dependency="EnablePreferences"
			android:summary="Selec Day of the Week" android:entries="@array/daysOfWeek"
			android:entryValues="@array/daysOfWeekValues" />
		<EditTextPreference android:title="Edit Text Preference"
			android:key="Name" android:dependency="EnablePreferences"
			android:summary="Enter Your Name" android:dialogTitle="Enter Your Name"
			android:defaultValue="Android Partaker"/>
		<RingtonePreference android:title="Ringtone Preference"
			android:key="Ringtone" android:dependency="EnablePreferences"
			android:summary="Select Ringtone" android:ringtoneType="all" />
	</PreferenceCategory>

	<PreferenceCategory android:title="Advance Preference">
		<PreferenceScreen android:title="Advance Preference">

			<EditTextPreference android:title="Enter Text"
				android:key="Text" />
		</PreferenceScreen>
	</PreferenceCategory>
</PreferenceScreen>

Let us look at the preference.xml (res/xml) for the above example to understand each of the preferences.

PreferenceScreen is the root element of the xml and is use to define screen for Preference.

PreferenceCategory element is use for grouping the preference. As seen there are 3 PreferenceCategory Main, Other Preferences and Advance Preferenc.

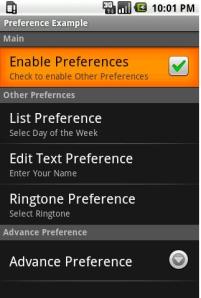
CheckBoxPreference defines preference of type CheckBox which can either be checked or unchecked. Here in the example key EnablePreferences defined via attribute android:key will hold the value whether CheckBox is checked or not.CheckBoxPreference is defined under PreferenceCategory Main (android:title)

CheckBox Preference

CheckBox Preference

PreferenceCategory Other Preferences group ListPreference, EditTextPreference and RingtonePreference. Before we go ahead and understand them let me point one attribute which is in common to all the three preference this category.

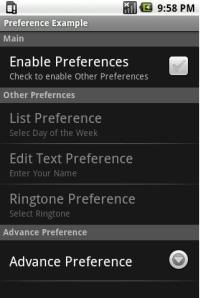
All the 3 preferences have attribute android:dependency in common. Has the name suggest this attribute android:dependency set a dependency. As seen here in the example the value for this attribute is EnablePreferences which actually is the key of CheckBoxPreference of PreferenceCategory Main. Thus the dependency of all the 3 preferences in Other Preferences category is with CheckBoxPreference i.e. this preferences will be enabled only if CheckBox Preference is checked.

CheckBox Preference

CheckBox Preference

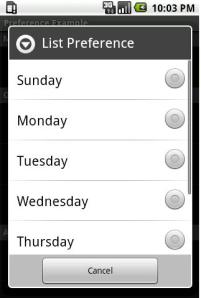
ListPreference this preference display list of values and help is selecting one. In the above example ListPreference will show list of Days of Week. List of days of week is provided via xml file daysOfWeek.xml (res/values) as shown below. Attribute android:entries will point to arrays daysOfWeek (android:entries=“@array/daysOfWeek”) and android:entryValue hold the corresponding value defined for each of the days of the week (android:entryValues=“@array/daysOfWeekValues”).

<?xml version="1.0" encoding="utf-8"?>
<resources>
	<string-array name="daysOfWeek">
		<item>Sunday</item>
		<item>Monday</item>
		<item>Tuesday</item>
		<item>Wednesday</item>
		<item>Thursday</item>
		<item>Friday</item>
		<item>Saturday</item>
	</string-array>
	<string-array name="daysOfWeekValues">
		<item>1</item>
		<item>2</item>
		<item>3</item>
		<item>4</item>
		<item>5</item>
		<item>6</item>
		<item>7</item>
	</string-array>
</resources>
List Preference

List Preference

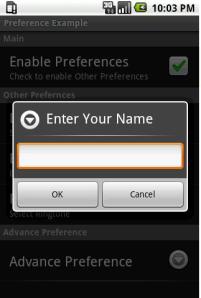
EditTextPreference as name suggest all editing of the value it holds. We can set title of the dialog which is opened on click via android:dialogTitle in case this attribute is not set then Preference title (android:title) is used as dialog title.

EditText Preference

EditText Preference

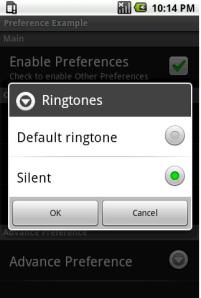
RingtonePreference will show the list of ringtones and also allow selecting default ringtone or selecting silent mode. One can control the list of ringtone to be shown via attribute android:ringtoneType. Valid values for ringtone type are ringtone, notification, alarm and all.

Ringtone Preference

Ringtone Preference

PreferenceCategory Advance Preference defines another PreferenceScreen Advance Preference. PreferenceScreen is configured with EditTextPreference. Hence this new PreferenceScreen opens with with EditTextPreference as configured.

Advance Preference

Advance Preference

Java Code

Below is the code snippet for PreferenceActivity showing how to use the preference.xml (res/xml) for bring up Preferences.

public class PreferenceExample extends PreferenceActivity{

	@Override
    public void onCreate(Bundle savedInstanceState) {
        super.onCreate(savedInstanceState);
        addPreferencesFromResource(R.xml.preference);
    }
}

addPreferencesFromResorce() method will read the preference.xml from res/xml and will render the PreferenceScreen accordingly.

Fetch Values from Preferences

So far we have looked at configuring and bring up the preferences. Now let us look at the code to fetch the values.

SharedPreferences _sharedPreferences  = PreferenceManager.getDefaultSharedPreferences(getBaseContext());
String name = _sharedPreferences.getString(“Name”, “NA”);

1. Create instance of SharedPreferences.

2. Now we can use instance of SharedPreference for fetching values. First parameter of getString method is the key of the preference and second parameter represents the value to be returned in case the key is not present.

Initialize Preferences with default value

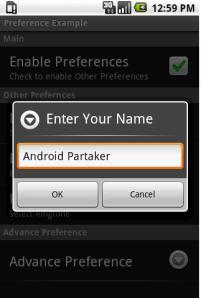
When we 1st use Preferences they are empty, but in many cases we need to initialize preferences with some default values. We can achieve this with 1st setting default value using attribute android:defaultValue in xml and then use following line of code to initialize preferences with the set default values

PreferenceManager.setDefaultValues(PreferenceExample.this, R.xml.preference, false);

As seen we have set default value for EditTextPreference of Other Preferences category in preference.xml. But when we ran the code without setting the default values in PreferenceActivity we can see empty EditText coming up when we click on EditTextPreference in Other Preferences category. Now modify the code of PreferenceActivity as follows and run to see EditText been initialized with default value.

public class PreferenceExample extends PreferenceActivity{

	@Override
    public void onCreate(Bundle savedInstanceState) {
        super.onCreate(savedInstanceState);
        addPreferencesFromResource(R.xml.preference);
        PreferenceManager.setDefaultValues(PreferenceExample.this, R.xml.preference, false);
    }
}
EditText Preference initialized with default value

EditText Preference initialized


Introduction to Android UI Layouts

12 Comments

Considering the fact that available space on mobile screen is small, UI design of mobile application is very important. For Android each screen follows one or more layout.
Layouts are like container that holds various view or layouts. Placing of views on the screen depends on the layout selected.

This article will introduce following basic layouts with examples:

  • Linear Layout
  • Table Layout
  • Absolute Layout
  • Relative Layout
  • Frame Layout

Let us now look at each of them in details and understand them.

  1. Linear Layout
  2. Linear Layout is the simplest layout. As the name suggest views are place in the linear flow one after the other. However we can specify the orientation of linear flow i.e. horizontally or vertically.

    Vertical Orientation

    <?xml version="1.0" encoding="utf-8"?>
    <LinearLayout xmlns:android="http://schemas.android.com/apk/res/android"
    	android:orientation="vertical" android:layout_width="fill_parent"
    	android:layout_height="fill_parent">
    
    	<Button android:text="Button01" android:id="@+id/Button01"
    		android:layout_width="wrap_content"
            android:layout_height="wrap_content" />
    
    	<Button android:text="Button02" android:id="@+id/Button02"
    		android:layout_width="wrap_content"
            android:layout_height="wrap_content" />
    
    </LinearLayout>


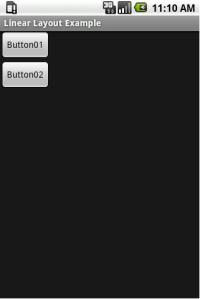
    Above XML defines Linear Layout with vertical orientation (android:orientation=”vertical”) with 2 buttons (Button01 and Button02) . And since vertical orientation is specified, both the buttons are placed linearly one below the other.

    Linear Layout Vertical Orientation

    Linear Layout Vertical Orientation

    Horizontal Orientation

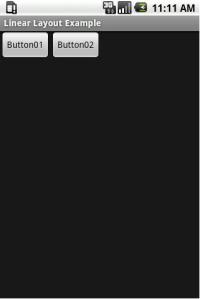
    Now for above XML change orientation for Linear Layout from vertical to horizontal (android:orientation=”horizontal”) as shown below.  And now both the buttons will be placed linearly next to each other.

    <?xml version="1.0" encoding="utf-8"?>
    <LinearLayout xmlns:android="http://schemas.android.com/apk/res/android"
    	android:orientation="horizontal" android:layout_width="fill_parent"
    	android:layout_height="fill_parent">
    
    	<Button android:text="Button01" android:id="@+id/Button01"
    		android:layout_width="wrap_content"
            android:layout_height="wrap_content" />
    
    	<Button android:text="Button02" android:id="@+id/Button02"
    		android:layout_width="wrap_content"
            android:layout_height="wrap_content" />
    
    </LinearLayout>
    
    
    Linear Layout Horizontal Orientation

    Linear Layout Horizontal Orientation

  3. Table Layout
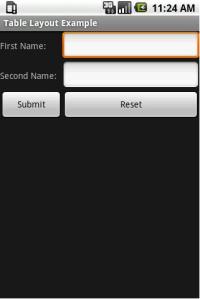
  4. Again as name suggest this layout places the view/components in tabular format as seen below.

    Table Layout

    Table Layout

    <?xml version="1.0" encoding="utf-8"?>
    <TableLayout android:id="@+id/TableLayout01"
    	android:layout_width="fill_parent" android:layout_height="fill_parent"
    	xmlns:android="http://schemas.android.com/apk/res/android">
    	<TableRow android:id="@+id/TableRow01">
    		<TextView android:id="@+id/TextView01" android:text="First Name:"
    			android:width="100px" />
    		<EditText android:id="@+id/EditText01" android:width="220px" />
    	</TableRow>
    
    	<TableRow android:id="@+id/TableRow02">
    		<TextView android:id="@+id/TextView02" android:text="Second Name:" />
    		<EditText android:id="@+id/EditText02" />
    	</TableRow>
    
    	<TableRow android:id="@+id/TableRow03">
    		<Button android:id="@+id/Button01"
                android:layout_width="wrap_content"
    			android:layout_height="wrap_content" android:text="Submit" />
    
    		<Button android:id="@+id/Button02"
                android:layout_width="wrap_content"
    			android:layout_height="wrap_content" android:text="Reset"
    			android:width="100px" />
    	</TableRow>
    </TableLayout>


    As shown Table consist of three rows (Table Row) and each row as two views/components. Maximum numbers of components in a single row specify the number of columns in table. While width of column is determined by the maximum width of the components in the column across all the rows. We can see the same in this example where we have specified width of Reset button in xml to 100 pixel  (android:width=”100px”), but it’s width is same as that of Edit Text.

  5. Relative Layout
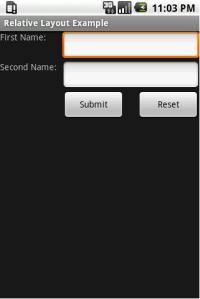
  6. This layout is the flexible layout of all. This layout allows placing of the components relative to other component or layout. Let us use the same example as that of Table layout  and do the same via Relative Layout.

    <?xml version="1.0" encoding="utf-8"?>
    <RelativeLayout android:id="@+id/RelativeLayout01"
    	android:layout_width="fill_parent" android:layout_height="fill_parent"
    	xmlns:android="http://schemas.android.com/apk/res/android">
    
    	<TextView android:id="@+id/TextView01"
            android:layout_width="wrap_content"
    		android:layout_height="wrap_content" android:text="First Name:"
    		android:width="100px" />
    
    	<EditText android:id="@+id/EditText01" android:layout_width="220px"
    		android:layout_height="wrap_content"
            android:layout_toRightOf="@+id/TextView01"
    		android:layout_below="@+id/RelativeLayout01" />
    
    	<EditText android:id="@+id/EditText02" android:layout_width="220px"
    		android:layout_height="wrap_content"
            android:layout_below="@+id/EditText01"
    		android:layout_alignLeft="@+id/EditText01" />
    
    	<TextView android:id="@+id/TextView02"
            android:layout_width="wrap_content"
    		android:layout_height="wrap_content" android:text="Second Name:"
    		android:width="100px" android:layout_below="@+id/EditText01"
    		android:layout_toLeftOf="@+id/EditText02" />
    
    	<Button android:text="Submit" android:id="@+id/Button01"
    		android:layout_width="100px" android:layout_height="wrap_content"
    		android:layout_below="@id/EditText02"
            android:layout_alignLeft="@id/EditText02" />
    
    	<Button android:text="Reset" android:id="@+id/Button02"
    		android:layout_width="100px" android:layout_height="wrap_content"
    		android:layout_below="@id/EditText02"
            android:layout_alignRight="@id/EditText02" />
    
    </RelativeLayout>
    

    Let us understand from the above XML how components are placed relative to each other.

    For example:

    EditText 01 has attributes android:layout_toRightOf=”@+id/TextView01″ and android:layout_below=”@+id/RelativeLayout01” this will place Edit Text next to Text View (First Name) . Similarly check EditText02 has attributes android:layout_below=”@+id/EditText01″ and android:layout_alignLeft=”@+id/EditText01″ this will place Edit Text box below the Edit Text 01.

    Relative Layout

    Relative Layout

  7. Absolute Layout
  8. This layout is used for placing views at the exact location on the screen using x and y co-ordinates.  As shown below in the XML, for both EditText and Button x and y coordinates have been specified via android:layout_x and android:layout_y respectively.

    <?xml version="1.0" encoding="utf-8"?>
    <AbsoluteLayout android:id="@+id/AbsoluteLayout01"
    	android:layout_width="fill_parent" android:layout_height="fill_parent"
    	xmlns:android="http://schemas.android.com/apk/res/android">
    	<EditText android:id="@+id/EditText01" android:layout_width="200px"
    		android:layout_height="wrap_content" android:layout_x="12px"
    		android:layout_y="12px" />
    	<Button android:text="Search" android:id="@+id/Button01"
    		android:layout_width="100px" android:layout_height="wrap_content"
    		android:layout_x="220px" android:layout_y="12px" />
    </AbsoluteLayout>
    
    
    Absolute Layout

    Absolute Layout

  9. Frame Layout
  10. Frame Layout is a single screen with all the views in this layout will be drawn on same screen anchored to the top left corner of the screen and hence it is likely that views can overlap each another unless  transparent.

    <?xml version="1.0" encoding="utf-8"?>
    <FrameLayout android:id="@+id/FrameLayout01"
    	android:layout_width="fill_parent" android:layout_height="fill_parent"
    	xmlns:android="http://schemas.android.com/apk/res/android">
    
    	<ImageView android:id="@+id/ImageView01" android:src="@drawable/android"
    		android:layout_width="fill_parent"
            android:layout_height="fill_parent"
    		android:scaleType="center" />
    
    	<TextView android:text="Android Partaker" android:id="@+id/TextView01"
    		android:layout_width="wrap_content"
            android:layout_height="wrap_content"
    		android:layout_marginBottom="20dip"
            android:layout_gravity="center_horizontal|bottom"
    		android:padding="10dip"
            android:textColor="#AA0000" android:textStyle="bold"
    		android:textSize="20px" android:background="#00000000" />
    
    </FrameLayout>
    

    In this example we have used Image View for image. Image to be display is provided as source via  android:src=”@drawable/android (here image android.jpg is available under res/drawable-hdpi). Text View is adjusted to it position with the help of android:layout_marginBottom=“20dip” and android:layout_gravity=“center_horizontal|bottom”

    Frame Layout

    Frame Layout

Conclusion

This article introduces the various android layouts via samples helping to understand them. Hopefully this has helped you through your first step towards android application development.