Considering the fact that available space on mobile screen is small, UI design of mobile application is very important. For Android each screen follows one or more layout.
Layouts are like container that holds various view or layouts. Placing of views on the screen depends on the layout selected.
This article will introduce following basic layouts with examples:
- Linear Layout
- Table Layout
- Absolute Layout
- Relative Layout
- Frame Layout
Let us now look at each of them in details and understand them.
- Linear Layout
- Table Layout
- Relative Layout
- Absolute Layout
- Frame Layout
Linear Layout is the simplest layout. As the name suggest views are place in the linear flow one after the other. However we can specify the orientation of linear flow i.e. horizontally or vertically.
Vertical Orientation
<?xml version="1.0" encoding="utf-8"?>
<LinearLayout xmlns:android="http://schemas.android.com/apk/res/android"
	android:orientation="vertical" android:layout_width="fill_parent"
	android:layout_height="fill_parent">

	<Button android:text="Button01" android:id="@+id/Button01"
		android:layout_width="wrap_content"
        android:layout_height="wrap_content" />

	<Button android:text="Button02" android:id="@+id/Button02"
		android:layout_width="wrap_content"
        android:layout_height="wrap_content" />

</LinearLayout>
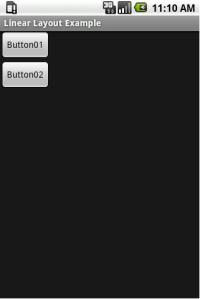
Above XML defines Linear Layout with vertical orientation (android:orientation=”vertical”) with 2 buttons (Button01 and Button02) . And since vertical orientation is specified, both the buttons are placed linearly one below the other.
Horizontal Orientation
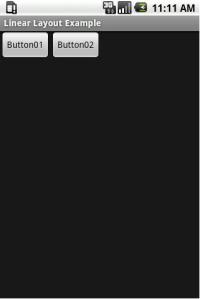
Now for above XML change orientation for Linear Layout from vertical to horizontal (android:orientation=”horizontal”) as shown below. And now both the buttons will be placed linearly next to each other.
<?xml version="1.0" encoding="utf-8"?>
<LinearLayout xmlns:android="http://schemas.android.com/apk/res/android"
	android:orientation="horizontal" android:layout_width="fill_parent"
	android:layout_height="fill_parent">

	<Button android:text="Button01" android:id="@+id/Button01"
		android:layout_width="wrap_content"
        android:layout_height="wrap_content" />

	<Button android:text="Button02" android:id="@+id/Button02"
		android:layout_width="wrap_content"
        android:layout_height="wrap_content" />

</LinearLayout>
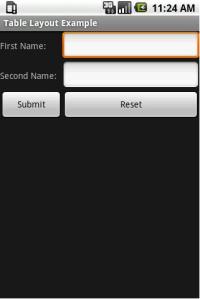
Again as name suggest this layout places the view/components in tabular format as seen below.
<?xml version="1.0" encoding="utf-8"?>
<TableLayout android:id="@+id/TableLayout01"
	android:layout_width="fill_parent" android:layout_height="fill_parent"
	xmlns:android="http://schemas.android.com/apk/res/android">
	<TableRow android:id="@+id/TableRow01">
		<TextView android:id="@+id/TextView01" android:text="First Name:"
			android:width="100px" />
		<EditText android:id="@+id/EditText01" android:width="220px" />
	</TableRow>

	<TableRow android:id="@+id/TableRow02">
		<TextView android:id="@+id/TextView02" android:text="Second Name:" />
		<EditText android:id="@+id/EditText02" />
	</TableRow>

	<TableRow android:id="@+id/TableRow03">
		<Button android:id="@+id/Button01"
            android:layout_width="wrap_content"
			android:layout_height="wrap_content" android:text="Submit" />

		<Button android:id="@+id/Button02"
            android:layout_width="wrap_content"
			android:layout_height="wrap_content" android:text="Reset"
			android:width="100px" />
	</TableRow>
</TableLayout>
As shown Table consist of three rows (Table Row) and each row as two views/components. Maximum numbers of components in a single row specify the number of columns in table. While width of column is determined by the maximum width of the components in the column across all the rows. We can see the same in this example where we have specified width of Reset button in xml to 100 pixel (android:width=”100px”), but it’s width is same as that of Edit Text.
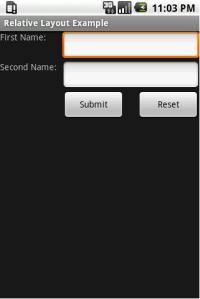
This layout is the flexible layout of all. This layout allows placing of the components relative to other component or layout. Let us use the same example as that of Table layout and do the same via Relative Layout.
<?xml version="1.0" encoding="utf-8"?>
<RelativeLayout android:id="@+id/RelativeLayout01"
	android:layout_width="fill_parent" android:layout_height="fill_parent"
	xmlns:android="http://schemas.android.com/apk/res/android">

	<TextView android:id="@+id/TextView01"
        android:layout_width="wrap_content"
		android:layout_height="wrap_content" android:text="First Name:"
		android:width="100px" />

	<EditText android:id="@+id/EditText01" android:layout_width="220px"
		android:layout_height="wrap_content"
        android:layout_toRightOf="@+id/TextView01"
		android:layout_below="@+id/RelativeLayout01" />

	<EditText android:id="@+id/EditText02" android:layout_width="220px"
		android:layout_height="wrap_content"
        android:layout_below="@+id/EditText01"
		android:layout_alignLeft="@+id/EditText01" />

	<TextView android:id="@+id/TextView02"
        android:layout_width="wrap_content"
		android:layout_height="wrap_content" android:text="Second Name:"
		android:width="100px" android:layout_below="@+id/EditText01"
		android:layout_toLeftOf="@+id/EditText02" />

	<Button android:text="Submit" android:id="@+id/Button01"
		android:layout_width="100px" android:layout_height="wrap_content"
		android:layout_below="@id/EditText02"
        android:layout_alignLeft="@id/EditText02" />

	<Button android:text="Reset" android:id="@+id/Button02"
		android:layout_width="100px" android:layout_height="wrap_content"
		android:layout_below="@id/EditText02"
        android:layout_alignRight="@id/EditText02" />

</RelativeLayout>
Let us understand from the above XML how components are placed relative to each other.
For example:
EditText 01 has attributes android:layout_toRightOf=”@+id/TextView01″ and android:layout_below=”@+id/RelativeLayout01” this will place Edit Text next to Text View (First Name) . Similarly check EditText02 has attributes android:layout_below=”@+id/EditText01″ and android:layout_alignLeft=”@+id/EditText01″ this will place Edit Text box below the Edit Text 01.
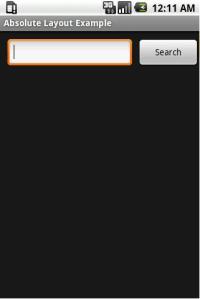
This layout is used for placing views at the exact location on the screen using x and y co-ordinates. As shown below in the XML, for both EditText and Button x and y coordinates have been specified via android:layout_x and android:layout_y respectively.
<?xml version="1.0" encoding="utf-8"?>
<AbsoluteLayout android:id="@+id/AbsoluteLayout01"
	android:layout_width="fill_parent" android:layout_height="fill_parent"
	xmlns:android="http://schemas.android.com/apk/res/android">
	<EditText android:id="@+id/EditText01" android:layout_width="200px"
		android:layout_height="wrap_content" android:layout_x="12px"
		android:layout_y="12px" />
	<Button android:text="Search" android:id="@+id/Button01"
		android:layout_width="100px" android:layout_height="wrap_content"
		android:layout_x="220px" android:layout_y="12px" />
</AbsoluteLayout>
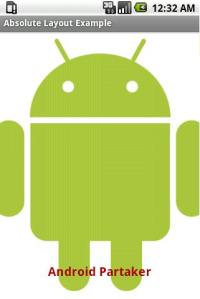
Frame Layout is a single screen with all the views in this layout will be drawn on same screen anchored to the top left corner of the screen and hence it is likely that views can overlap each another unless transparent.
<?xml version="1.0" encoding="utf-8"?>
<FrameLayout android:id="@+id/FrameLayout01"
	android:layout_width="fill_parent" android:layout_height="fill_parent"
	xmlns:android="http://schemas.android.com/apk/res/android">

	<ImageView android:id="@+id/ImageView01" android:src="@drawable/android"
		android:layout_width="fill_parent"
        android:layout_height="fill_parent"
		android:scaleType="center" />

	<TextView android:text="Android Partaker" android:id="@+id/TextView01"
		android:layout_width="wrap_content"
        android:layout_height="wrap_content"
		android:layout_marginBottom="20dip"
        android:layout_gravity="center_horizontal|bottom"
		android:padding="10dip"
        android:textColor="#AA0000" android:textStyle="bold"
		android:textSize="20px" android:background="#00000000" />

</FrameLayout>
In this example we have used Image View for image. Image to be display is provided as source via android:src=”@drawable/android“ (here image android.jpg is available under res/drawable-hdpi). Text View is adjusted to it position with the help of android:layout_marginBottom=“20dip” and android:layout_gravity=“center_horizontal|bottom”
Conclusion
This article introduces the various android layouts via samples helping to understand them. Hopefully this has helped you through your first step towards android application development.
