Menus are one of the most important parts of any application and when it comes to mobile Menus become more important considering the fact that area available is restricted. Through this blog we will look at the following various type of Android Menus available with example for each of them:
- Options Menu
- Context Menu
- Submenu
Options Menu:
Menu opened when MENU key on the device is clicked is called options menu.
Based on the number of menu options, options menu can be further classified as
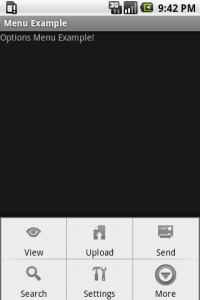
- Icon Menu : Options menu can have any number of menu options, but only 1st six options are shown directly on MENU key click of device and this is called as Icon Menu.
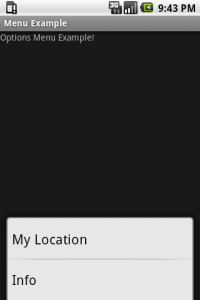
- Expanded Menu : In case there are more than six options then 1st five are show directly and remaining are available when More button is clicked and is called as Expanded Menu.
public boolean onCreateOptionsMenu(Menu menu) {
		menu.add(0, MENU_VIEW, 0, "View").setIcon(R.drawable.ic_menu_view);
		menu.add(0, MENU_UPLOAD, 0, "Upload").setIcon(R.drawable.ic_menu_upload);
		menu.add(0, MENU_SEND, 0, "Send").setIcon(R.drawable.ic_menu_send);
		menu.add(0, MENU_SEARCH, 0, "Search").setIcon(R.drawable.ic_menu_search);
		menu.add(0, MENU_SETTINGS, 0, "Settings").setIcon(R.drawable.ic_menu_settings);
		menu.add(0, MENU_MY_LOCATION, 0, "My Location").setIcon(R.drawable.ic_menu_mylocation);
		menu.add(0, MENU_INFO, 0, "Info").setIcon(R.drawable.ic_menu_info_details);
		return true;
	}
public boolean onOptionsItemSelected(MenuItem item) {
		switch(item.getItemId()){
		case MENU_VIEW:
			// Code for menu option View
			return true;
		case MENU_UPLOAD:
			// Code for menu option Upload
			return true;
		case MENU_SEND:
			// Code for menu option Send
			return true;
		case MENU_SEARCH:
			// Code for menu option Search
			return true;
		case MENU_MY_LOCATION:
			// Code for menu option Location
			return true;
		case MENU_SETTINGS:
			// Code for menu option Settings
			return true;
		case MENU_INFO:
			// Code for menu option Info
			return true;
		default:
			return false;
		}

	}

}
Points to Remember:
- onCreateOptionsMenu(): This method of the Activity is called on Menu Key click of the device. Override this method in the activity to populate the Menu object passed as parameter to this method.
- Multiple add() methods are available for adding Menu options. Use the one that accepts itemId as a parameter.
- setIcon() is used for assigning icon.
- onOptionItemSelected(): This method of the activity is called when a particular Item/Option of the menu is clicked. Override this method in the activity and provide code to perform respective actions based on the menu option selected.
It is not mandatory to have icon for Icon Menu options. But in case if icons are associated with menu options in that case Icon are displayed for Icon Menu only.
Context Menu:
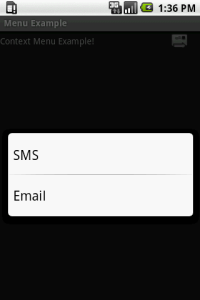
As name suggest, Context Menu is the menu in context/associated with some object. Long-press on the view will bring up registered Context menu.
public void onCreateContextMenu(ContextMenu menu, View v,
			ContextMenuInfo menuInfo) {
		super.onCreateContextMenu(menu, v, menuInfo);
		menu.add(0, MENU_SMS, 0, "SMS");
		menu.add(0, MENU_EMAIL, 0, "Email");
	}
public boolean onContextItemSelected(MenuItem item) {
		switch(item.getItemId()){
		case MENU_SMS:
			// Code for menu option Edit
			return true;
		case MENU_EMAIL:
			// Code for menu option Delete
			return true;
		default:
			return false;
		}
	}
For this example context menu is register to be shown on Button.
Button share = (Button)findViewById(R.id.Share);
		registerForContextMenu(share);
Points to Remember:
- registerForContextMenu(): This method is used to registered context menu with view.
- onCreateContextMenu(): This method of Activity is called on click (long-press) of registered view. Override this method to populate Context menu options.
- onContextItemSelected(): This method of activity is called when item/option from context menu is selected. Override this method in the activity and provide code to perform respective actions based on the menu option selected.
Submenus:
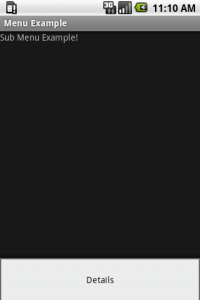
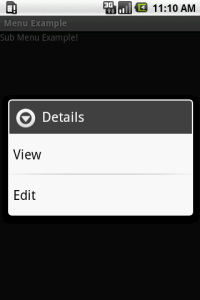
Sub menu is the nested menu that can be added to any type of menu (options or context menu).
Below code shows adding Submenu for Options menu:
public boolean onCreateOptionsMenu(Menu menu) {
		SubMenu subMenu = menu.addSubMenu("Details");
		subMenu.add(0,MENU_VIEW,0,"View");
		subMenu.add(0,MENU_EDIT,0,"Edit");
		return true;
	}
public void onCreateContextMenu(ContextMenu menu, View v,
			ContextMenuInfo menuInfo) {
		super.onCreateContextMenu(menu, v, menuInfo);
		menu.add(0, MENU_SMS, 0, "SMS");
		menu.add(0, MENU_EMAIL, 0, "Email");
	}
Points to Remember:
- Sub menu cannot be nested further i.e. Sub menu cannot have sub menu.
- When sub menu item is clicked, the parent menus onItemSelected method is called. In above example, sub menu is for options menu item hence, on click of sub menu item, onOptionsItemSelected method is called.
Defining Menu via XML
Instead initiating Menu in code as shown above the best practice is to define menu in XML and then inflate menu using this XML in the code. Thus by defining menu in XML, we separate design and implementation.
Options Menu via XML
Create sampleoptionsmenu.xml under folder res/menu
<?xml version="1.0" encoding="utf-8"?>
<menu xmlns:android="http://schemas.android.com/apk/res/android">
	<item android:title="View" android:id="@+id/MENU_VIEW"
		android:icon="@drawable/ic_menu_view" />
	<item android:title="Upload" android:id="@+id/MENU_UPLOAD"
		android:icon="@drawable/ic_menu_upload" />
	<item android:title="Send" android:id="@+id/MENU_SEND"
		android:icon="@drawable/ic_menu_send" />
	<item android:title="Search" android:id="@+id/MENU_SEARCH"
		android:icon="@drawable/ic_menu_search" />
	<item android:title="Settings" android:id="@+id/MENU_SETTINGS"
		android:icon="@drawable/ic_menu_settings" />
	<item android:title="My Location" android:id="@+id/MENU_MY_LOCATION"
		android:icon="@drawable/ic_menu_mylocation" />
	<item android:title="Info" android:id="@+id/MENU_INFO"
		android:icon="@drawable/ic_menu_info_details" />
</menu>
 public boolean onCreateOptionsMenu(Menu menu) {
	MenuInflater inflater = new MenuInflater(this);
	inflater.inflate(R.menu.sampleoptionsmenu, menu);
	return true;
}
As we can see if we use XML for creating menu the code in onCreateOptionsMenu() method is reduced.
Let us look at each element:
- <menu>: This element act as a container for menu items. This element must be the root node of the file.
- <item>: Represents menu item. Can have <menu> as sub elements for creating sub menus
- <group>: Optional element, that allows grouping of element.
Submenu via XML
<?xml version="1.0" encoding="utf-8"?>
<menu
  xmlns:android="http://schemas.android.com/apk/res/android">
  <item android:id="@+id/MENU_DETAILS"
	android:title="Details">
	<menu>
		<item android:id="@+id/MENU_VIEW" android:title="View"></item>
		<item android:id="@+id/MENU_EDIT" android:title="Edit"></item>
	</menu>
</item>
</menu>
Conculsion
This blog post covered all type of menus (options, context and submenu) available in Android with sample code.



Dec 28, 2010 @ 17:14:56
Good review of menus.
Dec 28, 2010 @ 17:18:30
Thanks Tim
Sep 21, 2011 @ 06:20:04
Does context menu support FrameLayout? Because I try to use context menu on Framelayout, but it doesn’t work.
Sep 21, 2011 @ 12:42:03
Hi Hieu,
Yes you can have context menu even while using FrameLayout.
Couple of things to take care….
1. Use this method registerForContextMenu(view); (view here is the view on which you want to have context menu)
2. Over ride onCreateContextMenu and onContextItemSelected method and provide implementation.
3. Context Menu works on Long press on the view registered.
Hope this helps…
Oct 20, 2011 @ 09:25:26
This is a very useful and clear tutorial.